1. Before you start
Your school website has a private area called the admin. You sign in, change something, press Publish, and the website updates. That is the whole idea.
You cannot break it
This is worth saying first, because it stops most people from trying.
- You cannot change the design. There are no font, colour or size controls in the page editor, so a page can never end up looking wrong.
- You cannot lose the website. Every change is kept, so anything can be put back.
- Nothing you type goes live until you press Publish.
The worst thing that can happen is a spelling mistake. You can fix that in a minute.
What you need
- A computer, tablet or phone. A computer is easier for long pages.
- Your school email address, and the ability to read that inbox.
- The address of your admin. It is your website address with
/adminon the end.
About the pictures in this handbook
The screens shown here come from a made-up school called Riverside Primary School. Your own admin will carry your school's name, crest and colours, and your own pages. Everything else is in exactly the same place.
2. Signing in
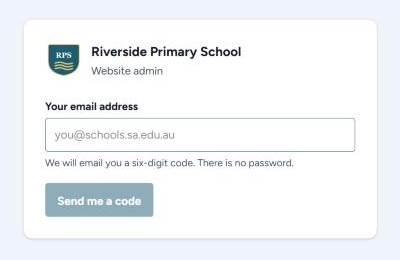
There is no password. Instead the website emails you a six-digit code each time you sign in. Nothing to remember, nothing to write down, nothing to reset.
- Go to your website and add
/adminto the end of the address. - Type your school email address.
- Press Send me a code.
- Open your email. A six-digit code will be waiting.
- Type the six digits into the website and press Sign in.
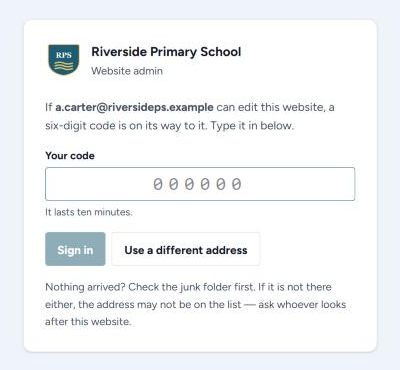
Once you are in, you stay signed in on that computer for a week. You only do this again when the week runs out, or when you use a different computer.
Read the email on your phone, type the code on the computer
That is fine and it is expected. The email carries a code, not a link, exactly so you can read it on one device and type it into another.
If no code arrives
- Check the junk or spam folder. This is nearly always where it is.
- Check you typed the address correctly.
- Wait a minute and press Send me a code again. The website will not send two codes within the same minute.
- If still nothing, your address may not be on the list of people allowed to edit. Ask whoever looks after the website to add you.
Why it never says "no such user"
The screen gives the same answer whether or not your address is allowed. If it said otherwise, anybody could sit there and work out which staff can edit the school's website. Only your inbox knows the difference.
Signing out
Sign out is in the top right corner. Use it on a shared office computer. On your own computer you can leave yourself signed in.
3. Finding your way around
Every screen in the admin is laid out the same way.

The coloured band
- Your school crest and name, on the left.
- The address you signed in with, on the right.
- View the website opens the real website, so you can check your work.
- Sign out.
The tabs
Each tab is one part of the website. They are in the order a school uses them: the ones you touch every week come first.
| Tab | What it looks after |
|---|---|
| Pages | The ordinary pages of the website and the words on them. |
| Newsletters | The newsletter PDFs, by date. |
| News and notices | Short announcements, with a date they disappear. |
| Photos | Albums of photographs from school events. |
| Calendar | Term dates, assemblies and events. |
| Enrolment Form | The enquiry form, and where enquiries are emailed. |
| Contact details | The address, phone, email and map on the contact page. |
| Navigation | The menu across the top of every page. |
| Branding | The school name, the logo and the colours. |
| Who can edit | The staff who may sign in. Only some people see this tab. |
The list screens all look the same
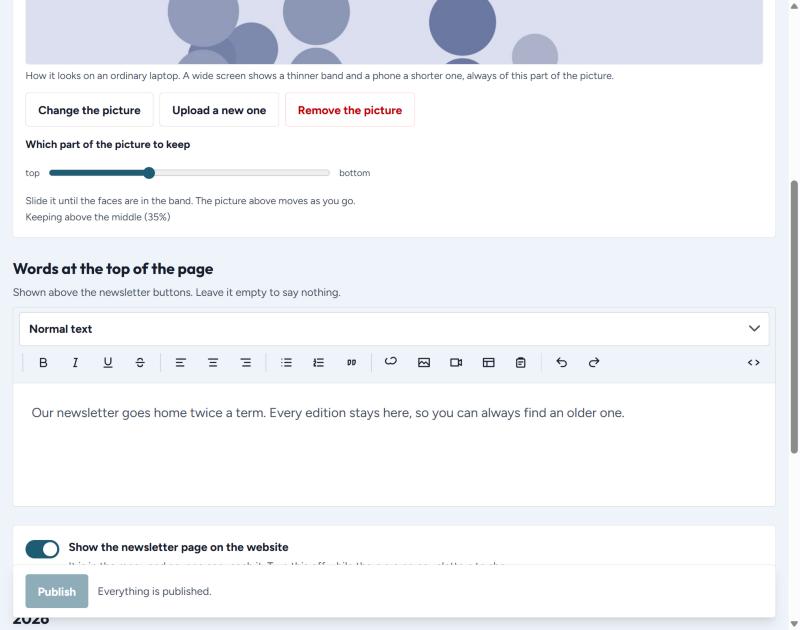
Newsletters, news and notices, photos and the calendar are built the same way. Learn one and you have learned all four. Each starts with the same three things:
- Picture across the top — the banner for that page.
- Words at the top of the page — a sentence or two above the list. Leave it empty to say nothing.
- A switch that puts the page on the website, or takes it off.
Every school has every tab
Even if your school has no photo albums or no calendar yet, the tab is still there. A school with no photographs this term may have some next term, and you should not have to ask anyone to switch it on.
4. Publishing
This is the most important page in the handbook. It is also the shortest.
The one rule
Nothing you type reaches the website until you press Publish. You can change as much as you like first.
The Publish button sits in a bar at the bottom of the screen, and it follows you as you scroll. The bar tells you where things stand.

- "Everything is published" — your work is on the website. Nothing to do.
- "You have changes that are not live yet" — press Publish.
After you press it
You will see "Published. The website updates in about a minute." That minute is real. The website is rebuilt from scratch each time, which is why it is fast for visitors.
- Press Publish.
- Wait about a minute.
- Press View the website and look at the page.
- If it still looks old, reload the page in your browser.
Do not close the tab with work in it
If you close the tab before pressing Publish, your typing is gone. On most screens the browser will warn you first, but do not rely on it.
Publishing several things at once
On the list screens — newsletters, notices, photos, the calendar — you can add three or four things and then press Publish once. That is quicker than publishing after each one, and it is how the screens are meant to be used.
5. Pages
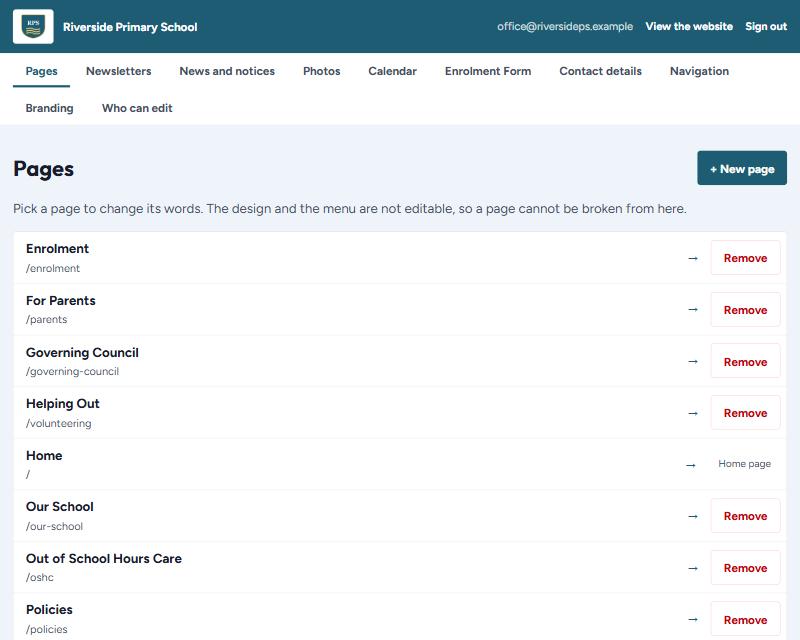
Pages holds the ordinary pages of your website: Our School, Enrolment, Uniform, and so on. This is where most of your work will happen.
Opening a page
Click the name of the page. To come back to the list, press ← All pages in the top right.
Your home page is in the list too, marked Home page. It cannot be removed, because a website must have a front door.
The page name
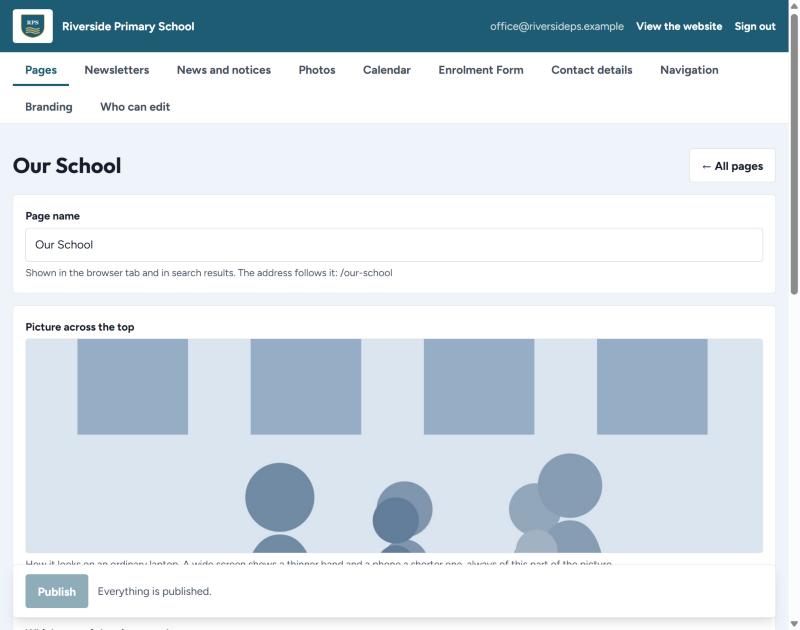
The name is shown in the browser tab and in search results. It is also what the menu says, so renaming a page renames it in the menu too.
Renaming changes the address
The web address is made from the name. If you rename
Uniform to School Uniform, the address changes from
/uniform to /school-uniform. The screen tells
you before you publish. Anyone who saved the old address will get a
page-not-found, and a link to it written inside another page will stop
working. The menu is moved for you.
Rename freely before a page is well known. Think twice afterwards.
The picture across the top
Most pages have a wide photograph across the top, called the banner. A page with no picture simply gets a shorter header, which is a perfectly good look.
Choosing a picture
- Press Choose a picture, or Change the picture if there is one already.
- Pick a tab: Pictures on the website or Your photo albums.
- Click the picture you want.
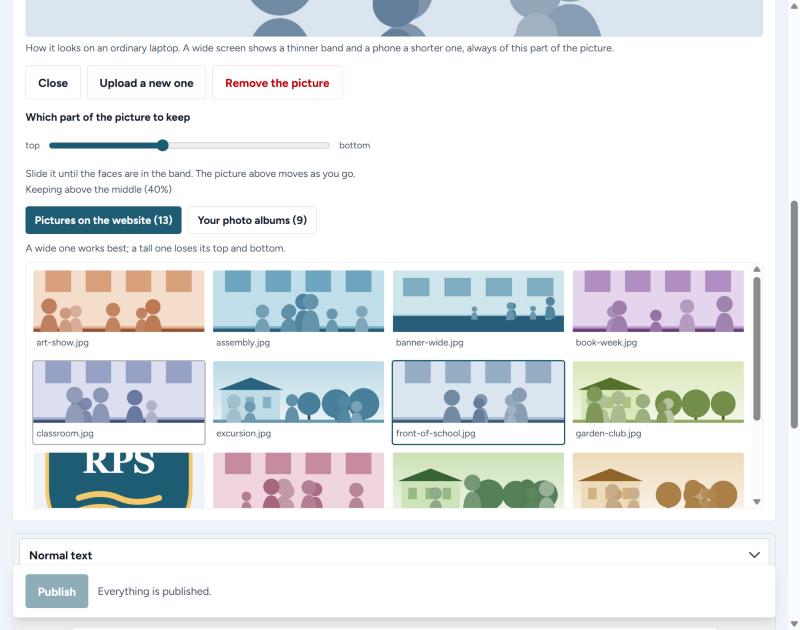
A wide picture works best. A tall one loses its top and bottom, because the banner is a wide, shallow strip.
Uploading your own
Press Upload a new one and choose a file from your computer. It joins the list, so you can use it on other pages later.
Moving the picture up and down
The banner is much wider than it is tall, so most of your photograph is cut away. The slider decides which part is kept.
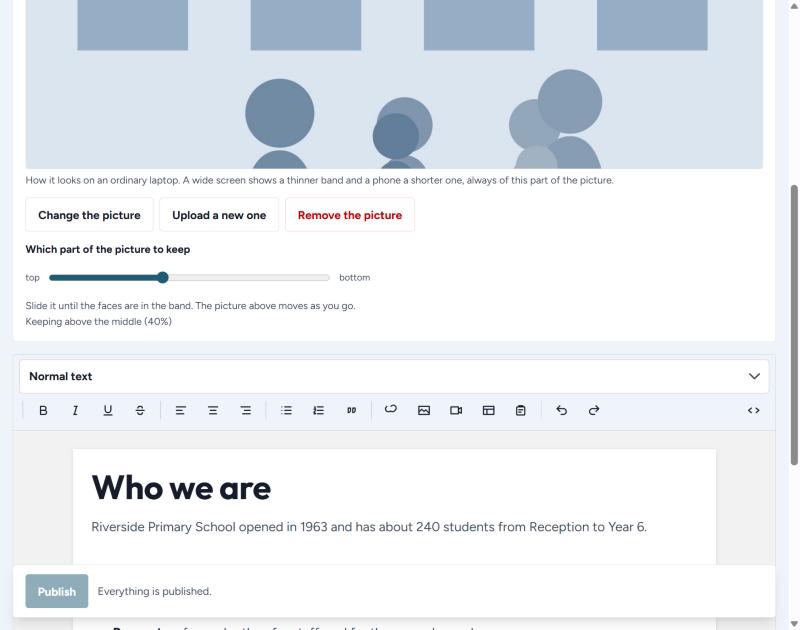
- Drag the slider left to keep more of the top of the photograph.
- Drag it right to keep more of the bottom.
- Stop when the faces are in the band.
Underneath, the screen says in words where you have landed — for example "Keeping above the middle (40%)".
If there is no slider
Some photographs are already the shape of the band. Nothing is being cut away, so there is nothing to choose, and the slider is hidden. That is not a fault.
Taking the picture off
Press Remove the picture. The page then has the shorter header. On your home page there is no Remove button, because the picture there is part of the design.
Making a new page
- On the Pages list, press + New page.
- Type what the page is called, for example School Council.
- Press Make the page.
- The page opens, empty. Write it, then press Publish.
- Go to Navigation to put it in the menu. Until you do, the page exists but nothing points at it.
Removing a page
- On the Pages list, press Remove beside the page.
- It asks "Remove it?". Press Yes, remove to go ahead, or Keep it to stop.
Check the menu afterwards
If the page you removed was in the menu, go to Navigation and take it out there too.
6. Writing the words
You type straight into the finished page. What you see is what a parent will see. There is no separate preview to remember.
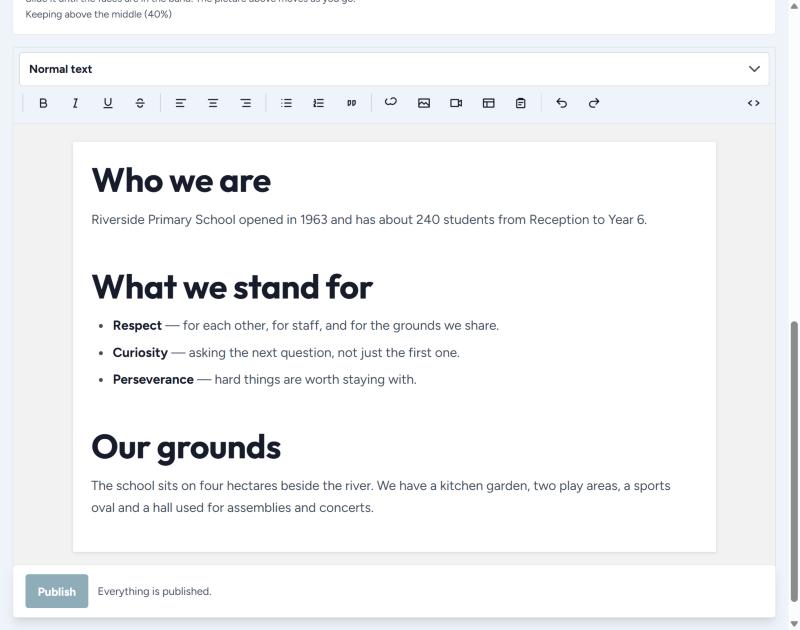
The row of buttons

There are no colour or font controls, on purpose
That is what keeps every page of the website looking like it belongs to the same school. The design is looked after for you.
Adding a link
- Select the words that should be the link.
- Press the link button.
- Type where it should go, then press Add link.
- For another page on your website, type the address part only:
/enrolment. - For another website, paste the whole thing:
https://….
To take a link off, select the words, press the link button, clear the box and press Remove link.
Adding a picture
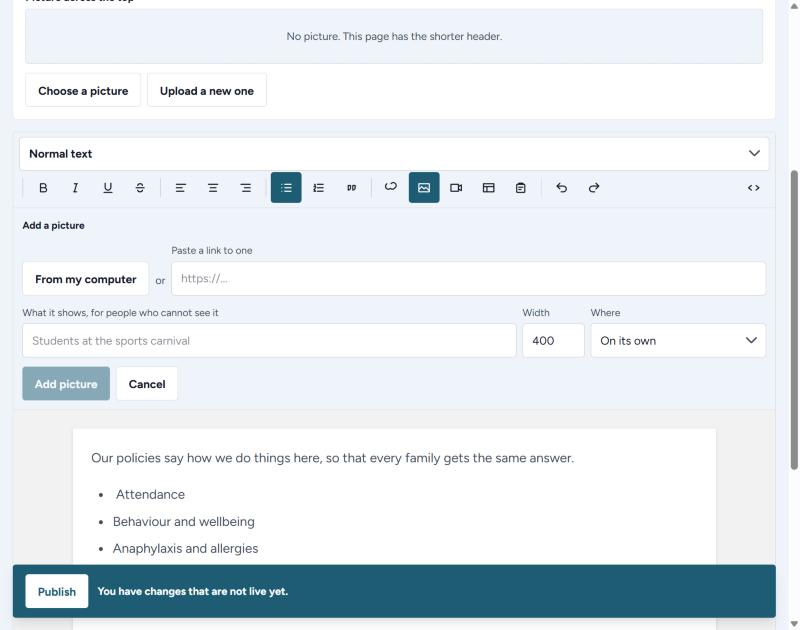
- Click in the page where you want the picture.
- Press the picture button.
- Press From my computer, or paste a link to a picture.
- Fill in what it shows. See the note below.
- Set the Width in dots. 400 is a good size beside words; 800 is large.
- Choose Where: on its own, in the middle, or with the text beside it.
- Press Add picture.
Always describe the picture
"What it shows, for people who cannot see it" is read aloud to blind visitors, and shown if the picture fails to load. Write what is happening — "Students planting in the kitchen garden" — not "photo" or the file name.
Adding a video
- Press the video button.
- Paste the link you see in your browser when watching it. YouTube and Vimeo both work.
- Say what the video is, for people using a screen reader.
- Press Add video.
You can also press Upload a video file to put a video of your own on the website. Keep those short — a long video is a very large file.
Adding the enrolment form
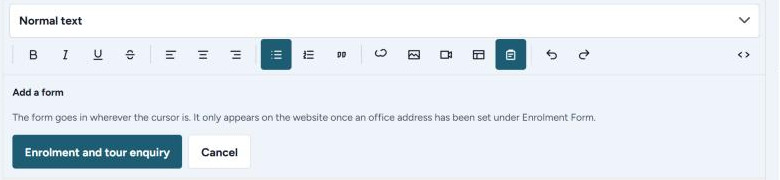
- Click in the page where the form should sit — usually at the bottom.
- Press the form button.
- Press Enrolment and tour enquiry.
It needs an office address first
The form only appears on the real website once an email address has been set under Enrolment Form. See section 11.
7. Newsletters
Every newsletter you add stays on the website, grouped by year, so a family can always find an older one.
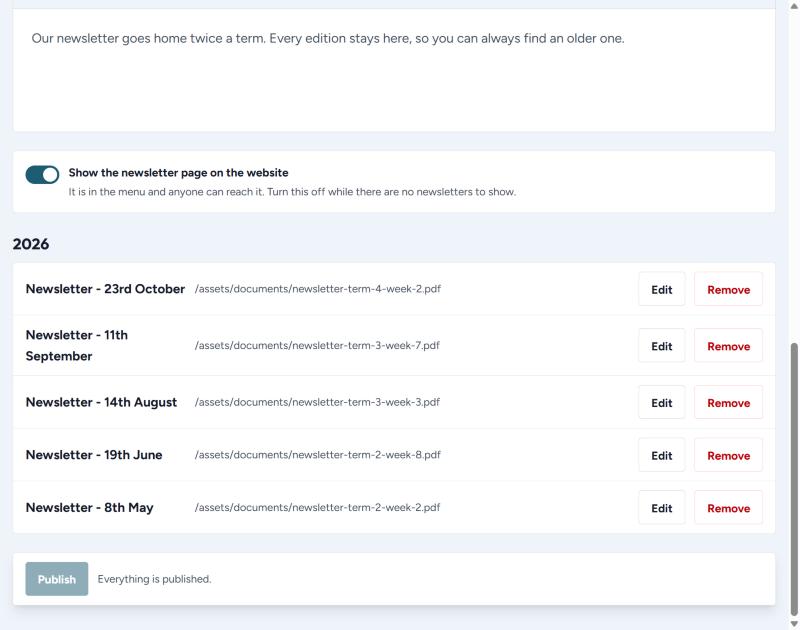
Adding one
- Press + Add newsletter.
- Pick the day it went out. The button on the website is named after that day, so pick the real date.
- Press Upload a PDF and either drag the file in or press Choose a file.
- Press Add.
- Add any others the same way, then press Publish once.
If the newsletter already lives somewhere else on the web, press Paste a link instead and paste the address.
Changing or removing one
Press Edit beside it to change the date or swap the file. Press Remove to take it off the website.
8. News and notices
Short announcements: sports day has moved, the canteen is closed on Friday, the book week parade is on Wednesday. The newsletter carries the long version; this is the quick one.
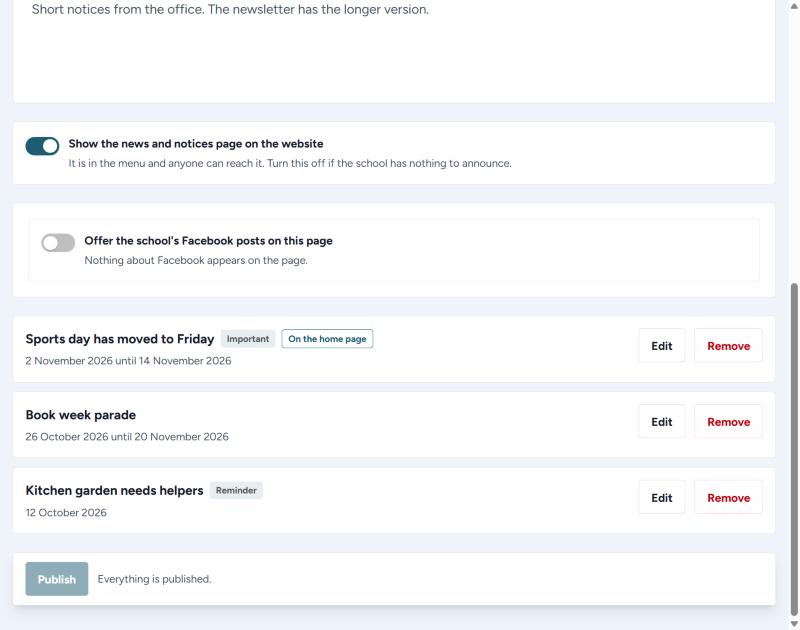
Adding a notice
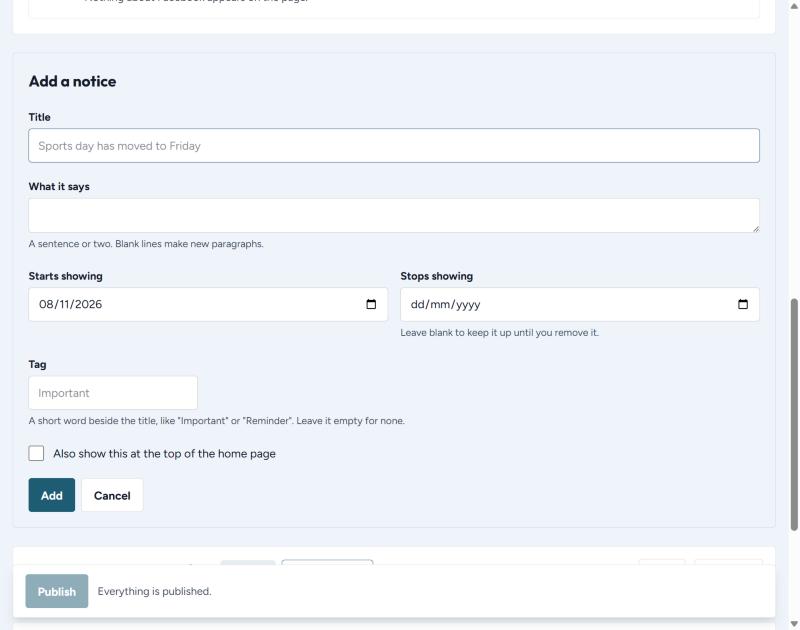
- Press + Add notice.
- Title — a short line, such as "Sports day has moved to Friday".
- What it says — a sentence or two. Leave a blank line to start a new paragraph.
- Starts showing — today, unless you are writing it in advance.
- Stops showing — the day it stops being true. Leave it blank to keep it up until you remove it.
- Tag — one short word beside the title, such as "Important" or "Reminder". Leave it empty for none.
- Tick Also show this at the top of the home page for something nobody should miss.
- Press Add, then Publish.
Use the "Stops showing" date
It is the single most useful box on this screen. A notice about a sports day in March should not still be on the website in June, and with a stop date you do not have to remember to take it down.
The two switches
- Show the news and notices page on the website — turn it off if the school has nothing to announce. The page leaves the website and the menu, and no notice is lost.
- Offer the school's Facebook posts on this page — if your school has a Facebook page, paste its address and visitors can see the posts here. Copy the address from the bar at the top of your browser when you are on the school's page, not a link to one post.
9. Photos
Photographs are kept in albums. One album per event works well.
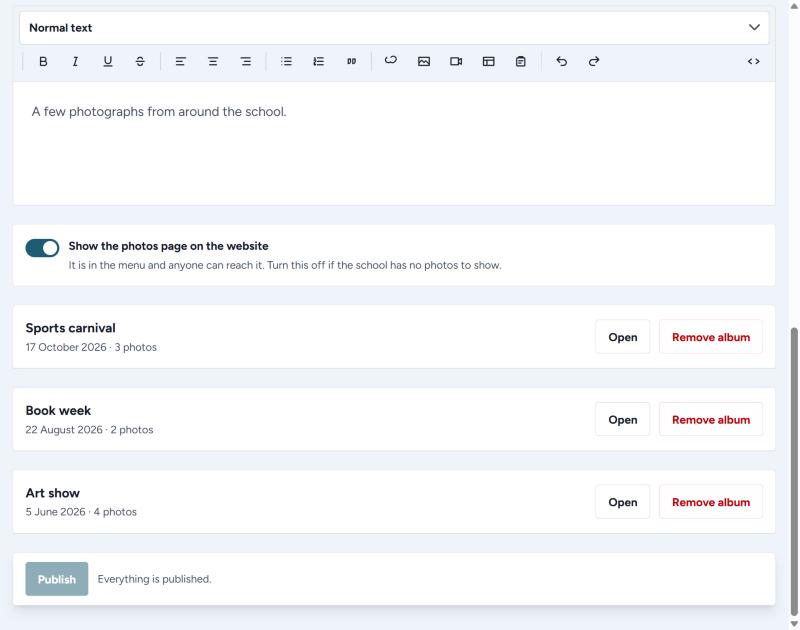
Making an album and adding photographs
- Press + New album.
- Give it a name and the date of the event.
- Add a sentence about it if you like. This is optional.
- Drag your photographs into the dotted box, or press Choose photos and pick several at once.
- Wait while they upload. It counts them off as it goes.
- Press Publish.
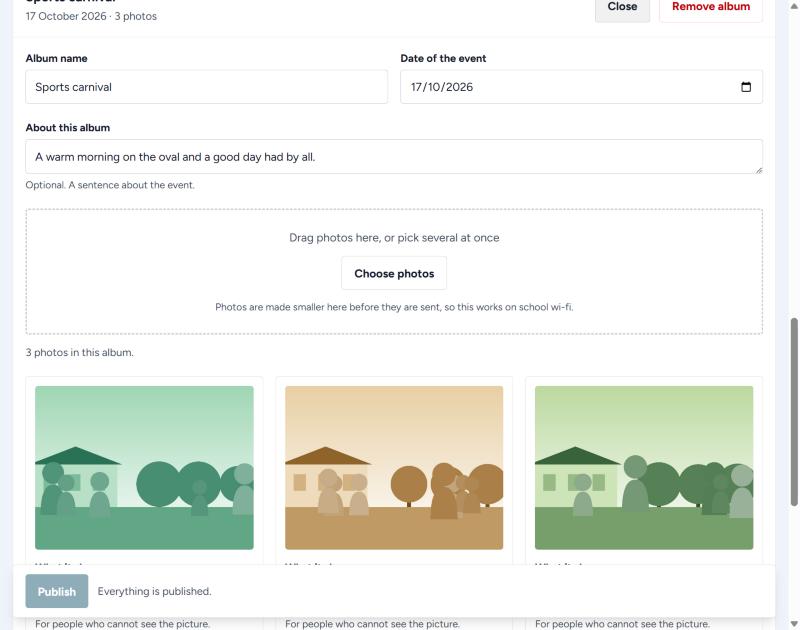
You do not need to shrink them first
Photographs are made smaller in your browser before they are sent, so this works on school wi-fi and you can upload straight from a camera or phone.
Describing each photograph
Under each one is a box: What it shows. Fill it in for people who cannot see the picture. One short sentence is plenty.
Switching the page off
Show the photos page on the website takes the whole photos page off the site and out of the menu. Your albums are kept, and come back the moment you switch it on again.
Before you put children on the web
Check your school's photograph permissions first. Once a picture is on a public website it can be copied, and taking it down later does not undo that.
10. Calendar
Term dates, assemblies, concerts and school closures.
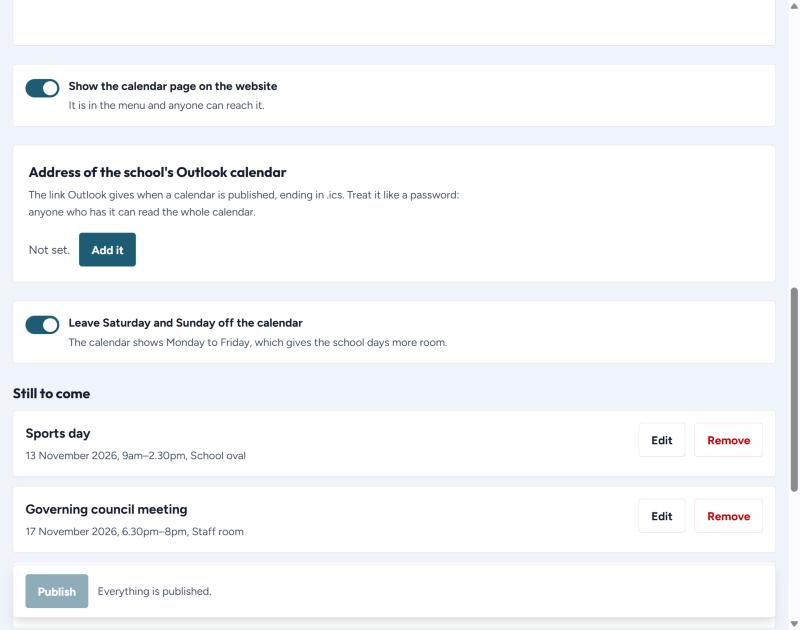
Adding an event
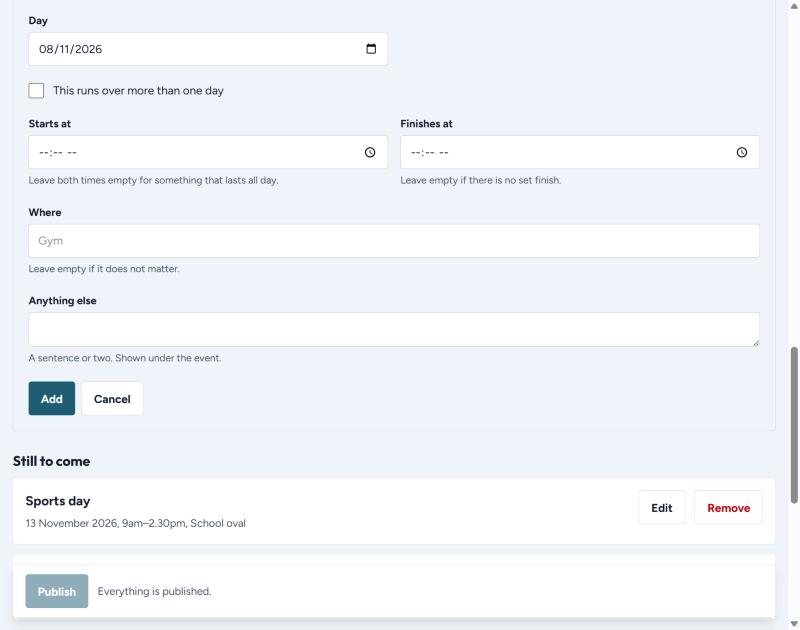
- Press + Add event.
- What it is — for example "School photo day".
- Day — the date. For something longer, tick This runs over more than one day and give the first and last day. The last day is the day it actually runs, not the day after.
- Starts at and Finishes at — leave both empty for an all-day event. Leave the finish empty if there is no set end.
- Where — the hall, the oval. Leave empty if it does not matter.
- Anything else — a sentence shown under the event.
- Press Add, then Publish.
Leaving weekends off
Leave Saturday and Sunday off the calendar shows Monday to Friday only, which gives the school days more room. Turn it off if you run weekend events.
Using the school's Outlook calendar
If the school keeps its events in Outlook already, the website can read them, so nobody types them twice.
- In Outlook, publish the calendar and copy the link it gives you. It ends in
.ics. - In the admin, under Address of the school's Outlook calendar, press Add it.
- Paste the whole address and press Save.
Treat that link like a password
Anybody who has it can read the whole calendar. Do not put it in an email to a parent, do not post it, and do not write it on a page. The admin only ever shows you the tail end of it after it is saved.
11. Enrolment Form
This is the form a family fills in to ask about enrolling, or to book a tour. What they write is emailed to the school office.
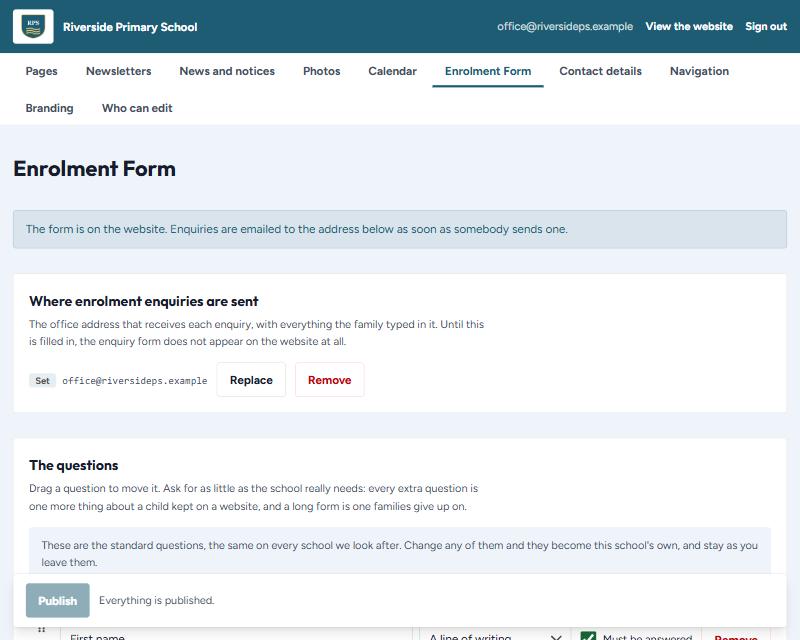
Switching it on
The form is off until the school says where enquiries should go. Until then, any page that has the form shows the school's telephone number and email address instead.
- Under Where enrolment enquiries are sent, press Add it.
- Type the office email address.
- Press Save.
This box saves on its own, straight away. It has no Publish button, because the address is never built into the website — it is kept privately, so no visitor can read it.
What happens to an enquiry
- It is emailed to that address as soon as somebody sends it.
- It is kept nowhere else — not on the website, and not in the admin.
- Pressing Reply in that email answers the family directly.
- If the email cannot be sent, the family is told so and asked to telephone, rather than being thanked for something that never arrived.
The questions
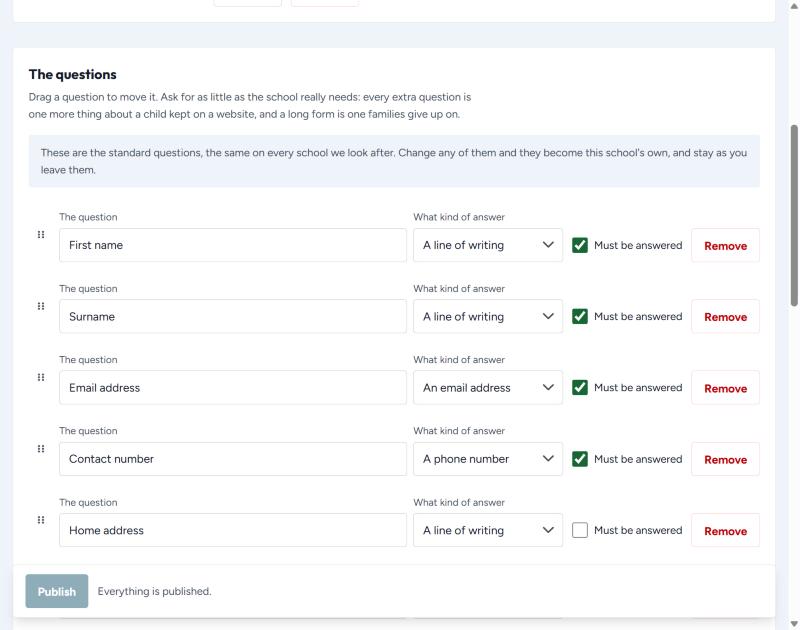
Every school starts with the same standard questions. The moment you change one, they become your school's own and stay as you leave them. A Use the standard questions button appears if you ever want to go back.
- The question — what the family sees, such as "First name".
- What kind of answer — a line of writing, a longer answer, an email address, a phone number, a date, or a choice.
- Must be answered — tick for the handful you really need. Everything else should be optional.
- + Add a question adds one at the bottom.
Ask for as little as you can
Every extra question is one more thing about a child kept on a website, and a long form is one families give up on. Name, a way to contact them, and what they want to know is usually enough.
Where the form appears
Wherever a page asks for it. Open the page under Pages and press the form button where you want it to sit — see section 6.
12. Contact details
The contact page is built from what is here. Nobody types that page by hand, so the school only ever has one address and one phone number to keep right.
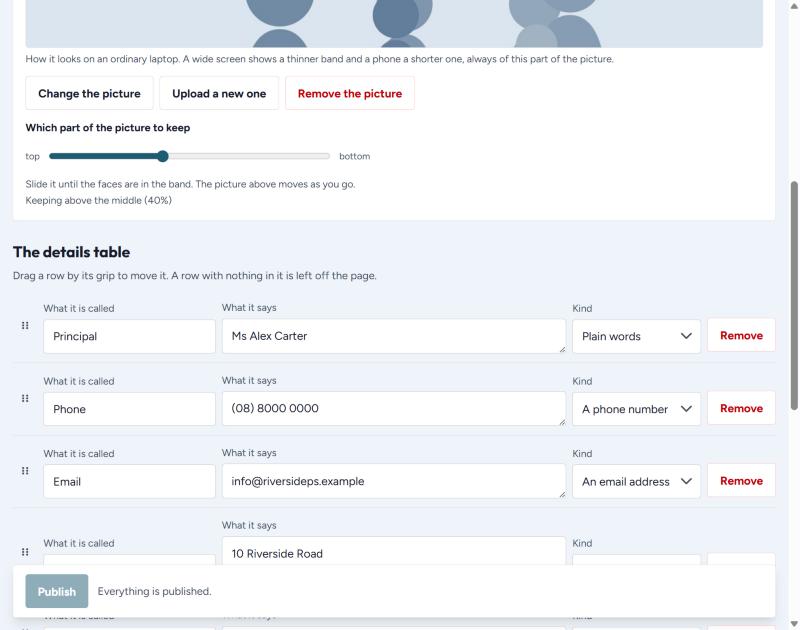
The details table
- What it is called — "Phone", "Principal", "Office hours".
- What it says — the value itself.
- Kind — plain words, a phone number, or an email address. Choosing the right kind makes it tappable on a phone, so a parent can ring you with one touch.
Drag a row by the grip on its left to move it. A row with nothing in it is simply left off the page, so an empty row does no harm.
The map
In Google Maps, find the school, choose Share, then Embed a map, and copy the address out of the code it gives you. Paste it in. Leave the box empty for no map.
Anything else to say
A short note under the table — office hours, where to park, how to reach the school out of hours.
13. Navigation
The menu across the top of every page.
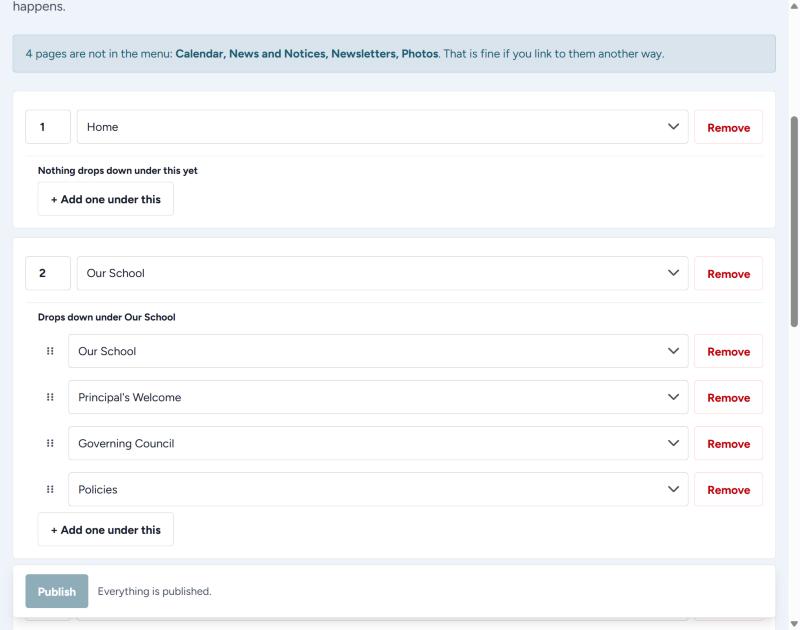
How it works
- Each menu item is just the page it points at. It shows that page's name, so renaming a page renames the menu too.
- Change a number to move a top-level item along the bar.
- Drag the items underneath to reorder what drops down.
Adding something to the menu
- Press + Add a menu item for a new item along the top, or + Add one under this to put it in a drop-down.
- Choose the page from the dropdown.
- Set its number if it should sit somewhere particular.
- Press Publish.
Finish what you start
A menu item with no page chosen stops you publishing, and the screen says so. Either pick a page for it or press Remove.
Two helpful messages
- "3 pages are not in the menu" — just so you know. That is fine if you link to them another way.
- A page that is switched off — such as photos or notices — keeps its place here but is not drawn on the website, and comes back the moment the page is switched on again. You do not need to change anything here when that happens.
14. Branding
The name, the logo and the colours the whole site is built from. Most schools set this once and never touch it again.
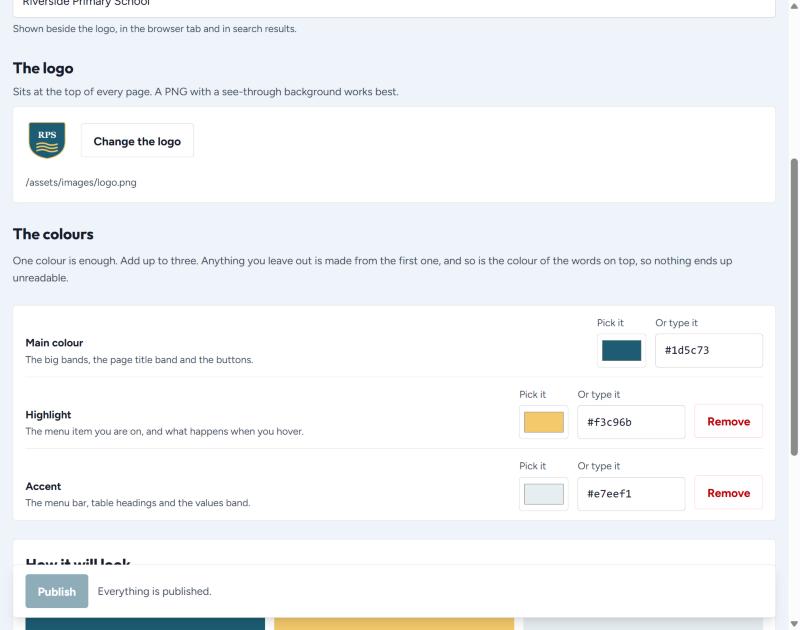
The name
Shown beside the logo, in the browser tab and in search results.
The logo
Press Change the logo and choose a file. A PNG with a see-through background works best — a logo with a white box around it will show that box on every page.
The colours
| Colour | Where it is used |
|---|---|
| Main | The big bands, the page title band and the buttons. |
| Highlight | The menu item you are on, and what happens when you hover. |
| Accent | The menu bar, table headings and the values band. |
Anything you leave out is worked out from the first colour — and so is the colour of the words on top, so nothing ever ends up unreadable.
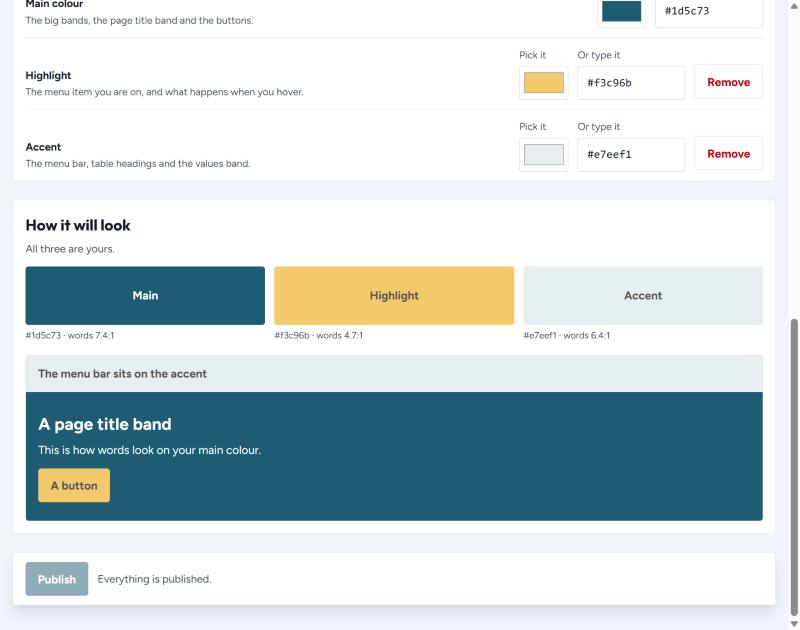
If a colour you pick would make the words hard to read, the screen tells you and explains what it will do instead. Trust it.
15. Who can edit
Only some people see this tab. If you cannot see it, you do not need it — ask whoever looks after the website.
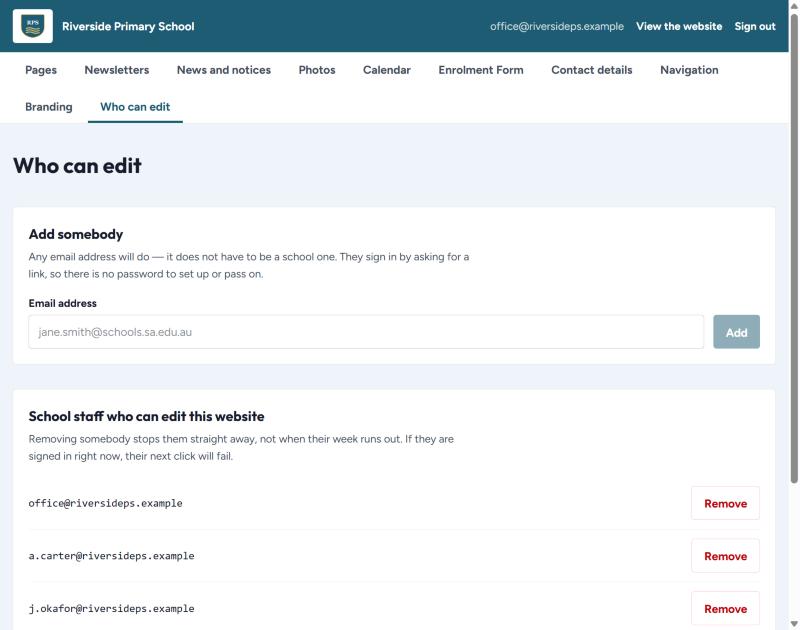
Adding somebody
- Type their email address.
- Press Add.
That is all. There is no password to set up or pass on — they sign in by asking for a code, like everyone else. Any email address will do; it does not have to be a school one.
Removing somebody
Press Remove. It takes effect straight away, not when their week runs out. If they are signed in at that moment, their very next click will fail.
Keep this list tidy
Take people off when they leave the school. It takes ten seconds and it is the single most useful security habit for a site like this.
16. If something looks wrong
I published, but the website still looks the same
Wait a minute and reload the page in your browser. The website is rebuilt each time you publish, and that takes about a minute.
If it is still wrong after five minutes, tell whoever looks after the website.
The Publish button is grey and will not press
That means there is nothing to publish — you have not changed anything yet.
It can also mean something on the screen needs finishing. Look for a red message: a page with no name, two pages with the same address, or a menu item with no page chosen.
A banner photograph is cutting off people's heads
Open the page, find Which part of the picture to keep, and drag the slider towards top. Watch the preview above as you drag.
The slider does not move my picture
That picture is already the shape of the band, so nothing is being cut away and there is nothing to choose. The slider hides itself when that is the case.
A page has disappeared from the menu
Check two things. First, whether the page was switched off on its own screen — photos, notices and the calendar each have a switch. Second, whether the menu item was removed under Navigation.
The enquiry form is not on the website
It needs two things: an office email address under Enrolment Form, and the form added to a page under Pages. Both, not either.
I renamed a page and now a link is broken
Renaming a page changes its web address. Find the page that linked to it, select the link, and point it at the new address.
I removed something by mistake
If you have not pressed Publish yet, leave the screen without publishing and it will come back as it was.
If you have published, tell whoever looks after the website. Every change is kept, so it can be put back.
There is a yellow or orange band at the top of the admin
It will say what is wrong. Either the website is not finished being set up, or the admin service is not answering. Pass the message on to whoever looks after the website, word for word.
I am asked to sign in again
Normal. You stay signed in for a week on each computer. Ask for a new code.
17. Getting help
If something here does not match what you see, or you are stuck, ask. It is quicker than guessing, and no question about this website is a silly one.
This website was built and is looked after by Onsite IT Solutions.
When you ask, it helps to say
- Which tab you were on — Pages, Newsletters, and so on.
- Which page you were editing.
- What you pressed, and what happened.
- The exact words of any message on the screen. A photograph of the screen is perfect.